5种不同方式安装mysql,本文以生产环境中使用比例最高的二进制文件安装方式进行演示。
软件仓库(YUM或APT)
RPM或DEB文件(通过官网直接下载对应的rpm包方式)
通用二进制文件安装(本文讲解)
源码编译安装
Docker
系统:Centos 7.8 软件:mysql 5.7.30
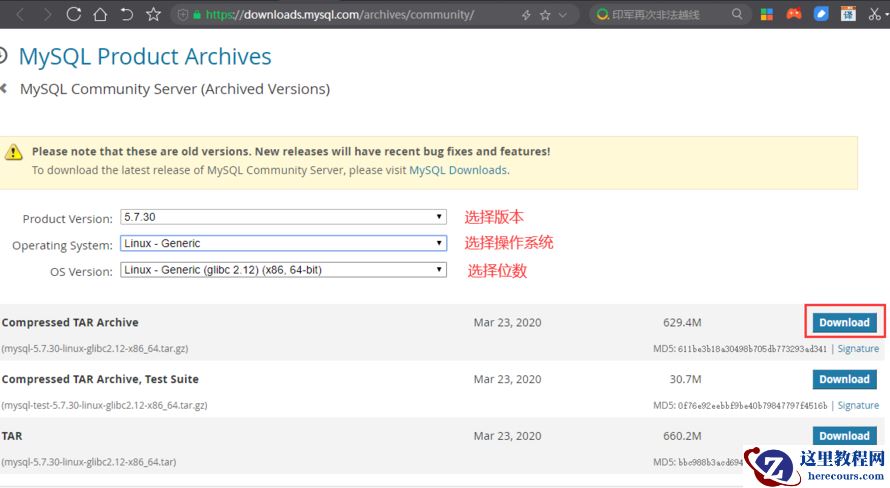
1. 软件下载
MySQL官网:https://www.mysql.com/
下载地址页面:
https://downloads.mysql.com/archives/community/
本次用到版本:
https://cdn.mysql.com/archives/mysql-5.7/mysql-5.7.30-linux-glibc2.12-x86_64.tar.gz可以使用 wget 命令直接下载到服务器上,当然,我是用迅雷下载到本地后上传到 linux 服务器中的
2. 创建目录,解压软件
2.1 创建软件目录
mkdir -p /opt/
2.2 创建数据目录
mkdir -p /data/mysql/data
2.3 解压二进制包到软件目录并重命名
[root@db03 tmp]# tar -zxvf mysql-5.7.30-linux-glibc2.12-x86_64.tar.gz -C /opt/
[root@db03 tmp]# cd /opt
[root@db03 opt]# ls
mysql-5.7.30-linux-glibc2.12-x86_64
[root@db03 opt]# mv mysql-5.7.30-linux-glibc2.12-x86_64/ mysql
[root@db03 opt]# ls
mysql
3. 处理原始环境中的mysql,并安装依赖库
如以前安装过mysql需要停止服务,并关闭开机自启。系统自带的 mariadb,及 /etc/my.cnf 文件也要删除掉
[root@db03 opt]# rpm -qa | grep mariadb
mariadb-libs-5.5.64-1.el7.x86_64
[root@db03 opt]# yum remove mariadb-libs.x86_64 -y
yum install -y libaio
4. 创建mysql用户
指定用户ID方式创建用户,方便用户和组ID号统一
[root@db03 opt]# groupadd -g 1002 mysql
[root@db03 opt]# useradd -u 1002 -g 1002 -M -s /sbin/nologin mysql
[root@db03 opt]# id mysql
uid=1002(mysql) gid=1002(mysql) groups=1002(mysql)
5. 配置环境变量
[root@db03 opt]# vim /etc/profile
export PATH=/opt/mysql/bin:$PATH        #在文件最后一行添加
[root@db03 opt]# source /etc/profile
[root@db03 opt]# mysql -V
mysql  Ver 14.14 Distrib 5.7.30, for linux-glibc2.12 (x86_64) using  EditLine wrapper
成功添加环境变量后就可以使用 mysql 命令了,我们查看一下版本
当然,我们这个时候还不能直接启动mysql,因为还没有数据字典。
6. 对mysql软件目录和数据目录进行授权
[root@db03 ~]# chown -R mysql.mysql /opt/mysql
[root@db03 ~]# chown -R mysql.mysql /data/mysql
7. 初始化数据(创建系统数据字典)
# 5.6以前版本使用 /opt/mysql/bin/mysql_install_db 命令 方法一:# 5.7版本推荐使用 mysqld 的 initialize 选项:
[root@db03 ~]# mysqld --initialize --user=mysql --basedir=/opt/mysql --datadir=/data/mysql/data
2020-09-04T13:24:27.350056Z 0 [Warning] TIMESTAMP with implicit DEFAULT value is deprecated. Please use --explicit_defaults_for_timestamp server option (see documentation for more details).
2020-09-04T13:24:29.183467Z 0 [Warning] InnoDB: New log files created, LSN=45790
2020-09-04T13:24:29.460700Z 0 [Warning] InnoDB: Creating foreign key constraint system tables.
2020-09-04T13:24:29.751027Z 0 [Warning] No existing UUID has been found, so we assume that this is the first time that this server has been started. Generating a new UUID: f6537d1f-eeb1-11ea-832e-000c293a5ca1.
2020-09-04T13:24:29.804702Z 0 [Warning] Gtid table is not ready to be used. Table 'mysql.gtid_executed' cannot be opened.
2020-09-04T13:24:30.571064Z 0 [Warning] CA certificate ca.pem is self signed.
2020-09-04T13:24:30.670782Z 1 [Note] A temporary password is generated for root@localhost: IwMoDFEoY2)D
初始化成功后,会在最后一行输出 root@localhost 用户的临时密码 --initialize 参数说明:1)对密码复制度有要求:12位数,4种类型2)密码有过期时间:180 天3)初始化后给 root@localhost 用户设置的临时密码,登陆不能进行任何操作,需要先修改密码 方法二: --initialize-insecure 参数:无限制,无临时密码现在我们用方法二的方式来初始化一次,首先删除用方法一中初始化的数据
[root@db03 ~]# \rm -rf /data/mysql/data/*
[root@db03 ~]# mysqld --initialize-insecure --user=mysql --basedir=/opt/mysql --datadir=/data/mysql/data
2020-09-04T13:44:15.606623Z 0 [Warning] TIMESTAMP with implicit DEFAULT value is deprecated. Please use --explicit_defaults_for_timestamp server option (see documentation for more details).
2020-09-04T13:44:16.338780Z 0 [Warning] InnoDB: New log files created, LSN=45790
2020-09-04T13:44:16.467616Z 0 [Warning] InnoDB: Creating foreign key constraint system tables.
2020-09-04T13:44:16.531753Z 0 [Warning] No existing UUID has been found, so we assume that this is the first time that this server has been started. Generating a new UUID: b9b3db4f-eeb4-11ea-be53-000c293a5ca1.
2020-09-04T13:44:16.533530Z 0 [Warning] Gtid table is not ready to be used. Table 'mysql.gtid_executed' cannot be opened.
2020-09-04T13:44:17.273207Z 0 [Warning] CA certificate ca.pem is self signed.
2020-09-04T13:44:17.328242Z 1 [Warning] root@localhost is created with an empty password ! Please consider switching off the --initialize-insecure option.
初始化成功后,输出的最后一行会告诉你 root@localhost 的密码为空
8. 准备一个最简配置文件
将以下内容写入到 /etc/my.cnf 配置文件中去
[mysqld]
user=mysql
basedir=/opt/mysql
datadir=/data/mysql/data
socket=/tmp/mysql.sock
server_id=6
port=3306
[mysql]
socket=/tmp/mysql.sock
9. 启动数据库
方法一: sys-v # centos6中管理方式
[root@db03 ~]# cp /opt/mysql/support-files/mysql.server /etc/init.d/mysqld
[root@db03 ~]# service mysqld start
Starting MySQL.Logging to '/data/mysql/data/db03.err'.
                                                           [  确定  ]
[root@db03 ~]# netstat -lnptu | grep 3306
tcp6       0      0 :::3306                 :::*                    LISTEN      13637/mysqld
方法二: systemd # centos7中管理方式 # 先关闭方法一中启动的 mysql
[root@db03 ~]# service mysqld stop
Shutting down MySQL..                                      [  确定  ]
# 写入启动文件
[root@db03 ~]# cat >/etc/systemd/system/mysqld.service <<EOF
[Unit]
Description=MySQL Server
Documentation=man:mysqld(8)
Documentation=http://dev.mysql.com/doc/refman/en/using-systemd.html
After=network.target
After=syslog.target
[Install]
WantedBy=multi-user.target
[Service]
User=mysql
Group=mysql
ExecStart=/opt/mysql/bin/mysqld --defaults-file=/etc/my.cnf
LimitNOFILE = 5000
EOF
[root@db03 ~]# systemctl start mysqld.service
[root@db03 ~]# netstat -lnptu | grep 3306
tcp6       0      0 :::3306                 :::*                    LISTEN      14093/mysqld
10. 登陆msyql测试
[root@db03 ~]# mysql -uroot -p
Enter password:                 # 方式一初始化,输入生成的临时密码。方式二初始化,密码为空,直接回车
Welcome to the MySQL monitor.  Commands end with ; or \g.
Your MySQL connection id is 2
Server version: 5.7.30 MySQL Community Server (GPL)
Copyright (c) 2000, 2020, Oracle and/or its affiliates. All rights reserved.
Oracle is a registered trademark of Oracle Corporation and/or its
affiliates. Other names may be trademarks of their respective
owners.
Type 'help;' or '\h' for help. Type '\c' to clear the current input statement.
mysql> show databases;
+--------------------+
| Database           |
+--------------------+
| information_schema |
| mysql              |
| performance_schema |
| sys                |
+--------------------+
4 rows in set (0.00 sec)
mysql> exit
Bye
11. 修改初始密码
[root@db03 ~]# mysqladmin -uroot -p password
Enter password: 	#输入旧密码,密码为空直接回车
New password: 		#输入新密码
Confirm new password: 	#再次确认新密码
Warning: Since password will be sent to server in plain text, use ssl connection to ensure password safety.
12. mysql无法启动情形排查
查看日志:
	在哪?
	/data/mysql/data/主机名.err
	[ERROR] 上下文
可能情况:
	/etc/my.cnf 填写的路径不对
	/tmp/mysql.sock文件修改过 或 删除过
	数据目录权限不是mysql
	参数改错了
	启动文件填写的路径不对
编辑推荐:
- 使用通用二进制文件在Linux系统上安装MySQL03-01
- MySQL多实例部署03-01
- MySQL latch争用深入分析03-01
- MySQL InnoDB脏页管理03-01
- MySQL8.0大表秒加字段,是真的吗?03-01
- 教你如何解决MySQL数据延迟跳动的问题03-01
- MySQL 连接相关参数03-01
- MySQL 对大表做归档03-01
相关推荐
-

-
-
-
-
-
-
-
-
-
-
-
-
-
-

雷神推出 MIX PRO II 迷你主机:基于 Ultra 200H,玻璃上盖 + ARGB 灯效
2 月 9 日消息,雷神 (THUNDEROBOT) 现已宣布推出基于英
-

制造商 Musnap 推出彩色墨水屏电纸书 Ocean C:支持手写笔、第三方安卓应用
2 月 10 日消息,制造商 Musnap 现已在海外推出一款 Oce


")
")
")