说明: 基于CentOS7.6系统安装 使用MySQL 5.7.26,MHA 0.58版本安装
1.系统配置
1.关闭防火墙 systemctl stop firewalld.service systemctl disable firewalld.service 2.关闭SElinux sed -i 's/^SELINUX=enforcing$/SELINUX=disabled/' /etc/selinux/config setenforce 0 3.设置主机名
| IP | hostname | 角色 |
| 10.10.10.50 | manager | MHA manager |
| 10.10.10.51 | mysql01 | MySQL DB Server - Master, MHA Node |
| 10.10.10.52 | mysql02 | MySQL DB Server- Slave, MHA Node |
| 10.10.10.53 | mysql03 | MySQl DB Server - Slave, MHA Node |
2.配置各节点间SSH互信
ssh-keygen ssh-copy-id manager ssh-copy-id mysql01 ssh-copy-id mysql02 ssh-copy-id mysql03
3.安装MHA Manager
yum -y install epel-release net-tools yum -y install perl-DBD-MySQL perl-Config-Tiny perl-Log-Dispatch perl-Parallel-ForkManager rpm -ivh mha4mysql-node-0.58-0.el7.centos.noarch.rpm rpm -ivh mha4mysql-manager-0.58-0.el7.centos.noarch.rpm
4.安装MHA Node
yum -y install epel-release net-tools yum -y install perl-DBD-MySQL perl-Config-Tiny perl-Log-Dispatch perl-Parallel-ForkManager rpm -ivh mha4mysql-node-0.58-0.el7.centos.noarch.rpm
5.部署GTID一主二从环境
略 备库执行set global read_only=on;不要写入配置文件 create user root@'%' identified by 'mysql'; grant all on *.* to root@'%'; 用于监控
6.配置MHA
mkdir -p /masterha/log mkdir -p /masterha/tmp mkdir -p /masterha/mysql mkdir -p /masterha/app1 touch /masterha/log/app1_manager.log vim /etc/masterha_default.cnf vim /etc/mha/app1.cnf vim /masterha/scripts/master_ip_failover vim /masterha/scripts/master_ip_online_change vim /masterha/scripts/send_report 检查配置 masterha_check_ssh --conf=/etc/mha/app1.cnf masterha_check_repl --conf=/etc/mha/app1.cnf
7.启动MHA
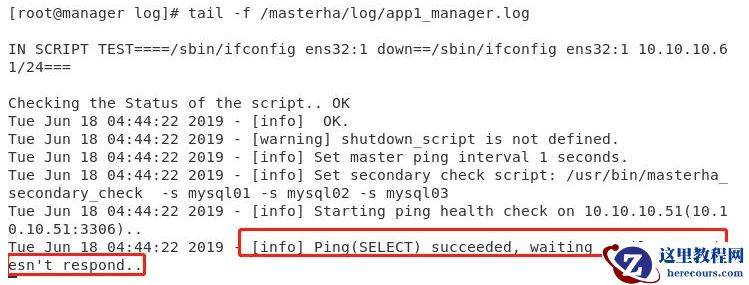
master(mysql01)执行:
ifconfig ens32:1 10.10.10.61/24
manager执行:
nohup
masterha_manager --conf=/etc/mha/app1.cnf --remove_dead_master_conf
--ignore_last_failover < /dev/null >
/masterha/log/app1_manager.log 2>&1 &
 masterha_check_status --conf=/etc/mha/app1.cnf

8.在线切换
关闭MHA
masterha_stop --conf=/etc/mha/app1.cnf
切换
masterha_master_switch
--conf=/etc/mha/app1.cnf --master_state=alive
--new_master_host=10.10.10.52 --orig_master_is_new_slave
--running_updates_limit=10000 --interactive=0
 登录数据库通过show master status; show slave status;检查,数据库角色切换成功
重新启动MHA
nohup
masterha_manager --conf=/etc/mha/app1.cnf --remove_dead_master_conf
--ignore_last_failover < /dev/null >
/masterha/log/app1_manager.log 2>&1 &
登录数据库通过show master status; show slave status;检查,数据库角色切换成功
重新启动MHA
nohup
masterha_manager --conf=/etc/mha/app1.cnf --remove_dead_master_conf
--ignore_last_failover < /dev/null >
/masterha/log/app1_manager.log 2>&1 &
9.failover
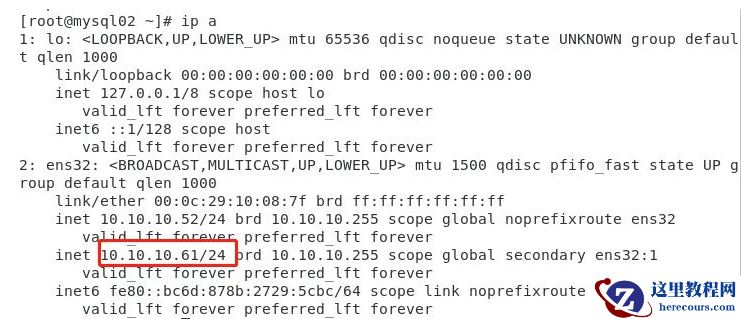
模拟主库故障,杀掉master节点MySQL进程(mysql01) 主库切换至mysql02 VIP漂移至mysql02 /etc/mha/app1.cnf中mysql01的信息被删除 mysql03主库重定向为mysql02
10.恢复踢出节点
关闭MHA: masterha_stop --conf=/etc/mha/app1.cnf /etc/mha/app1.cnf中恢复mysql01信息 [server1] candidate_master=1 hostname=10.10.10.51 port=3306 mysql01启动数据库并恢复(生产环境根据情况可能需要完全恢复),并加入主从 CHANGE MASTER TO MASTER_HOST ='10.10.10.52',MASTER_PORT =3306,MASTER_USER ='repl',MASTER_PASSWORD ='mysql',MASTER_AUTO_POSITION = 1; 重新启动MHA: nohup masterha_manager --conf=/etc/mha/app1.cnf --remove_dead_master_conf --ignore_last_failover < /dev/null > /masterha/log/app1_manager.log 2>&1 &


