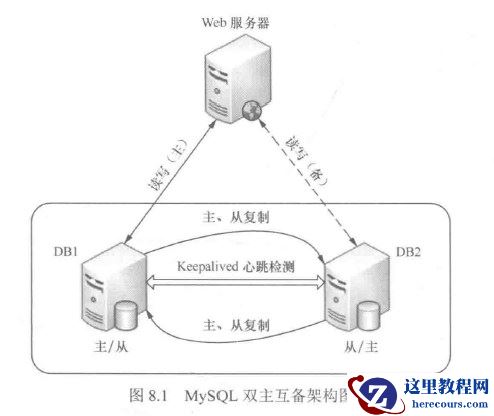
环境:
DB1:主服务器 centos6.6 mysql5.1.73
IP:10.24.24.111
DB2:从服务器 centos6.6 mysql5.1.73
IP:10.24.24.112
mysql VIP: 10.24.24.112
DB1 /etc/my.cnf配置,[mysqld]段添加:
server-id = 1
log-bin=mysql-bin
replay-log = mysql-relay-bin
replicate-wild-ignore-table=mysql.%
replicate-wild-ignore-table=test.%
replicate-wild-ignore-table=information_schema.%
DB /etc/my.cnf配置, [mysqld]段添加:
server-id = 2
log-bin=mysql-bin
relay-log = mysql-relay-bin
replicate-wild-ignore-table=mysql.%
replicate-wild-ignore-table=test.%
replicate-wild-ignore-table=information_schema.%
2.手动配置数据库
DB1先创建一个数据库及表,用于同步测试
mysql> create database ywadmin;
mysql> use ywadmin;
创建表
mysql> create table personal(member_no char(9) not null,name char(5),birthday date,exam_score tinyint,primary key(member_no));
查看表内容
mysql> desc personal;
+------------+------------+------+-----+---------+-------+
| Field | Type | Null | Key | Default | Extra |
+------------+------------+------+-----+---------+-------+
| member_no | char(9) | NO | PRI | NULL | |
| name | char(5) | YES | | NULL | |
| birthday | date | YES | | NULL | |
| exam_score | tinyint(4) | YES | | NULL | |
+------------+------------+------+-----+---------+-------+
4 rows in set (0.00 sec)
DB1进行锁表并备份数据库
mysql> flush tables with read lock;
Query OK, 0 rows affected (0.00 sec)
不要退出终端,否则锁表失败;新开启一个终端对数据进行备份,或者使用mysqldump进行备份
# cd /var/lib/
# tar zcvf mysql.tar.gz mysql
# scp -P50024 mysql.tar.gz root@10.24.24.112:/var/lib/
root@10.24.24.112's password:
mysql.tar.gz 100% 213KB 213.0KB/s 00:00
注意:此处需要开启DB2授权root远程登录
# vim /etc/ssh/sshd_config
#PermitRootLogin no
数据传输到DB2后,依次重启DB1,DB2的数据库
[root@DB1 ~]# /etc/init.d/mysqld restart
Stopping mysqld: [ OK ]
Starting mysqld: [ OK ]
[root@DB2 ~]# /etc/init.d/mysqld restart
Stopping mysqld: [ OK ]
Starting mysqld: [ OK ]
3.创建复制用户并授权
DB1上创建复制用户,
mysql> grant replication slave on *.* to 'repl_user'@'10.24.24.112' identified by 'repl_password';
Query OK, 0 rows affected (0.00 sec)
刷新授权表
mysql> flush privileges;
Query OK, 0 rows affected (0.00 sec)
mysql> show master status;
+------------------+----------+--------------+------------------+
| File | Position | Binlog_Do_DB | Binlog_Ignore_DB |
+------------------+----------+--------------+------------------+
| mysql-bin.000002 | 271 | | |
+------------------+----------+--------------+------------------+
1 row in set (0.00 sec)
然后在DB2的数据库中将DB1设为自己的主服务器
# cd /var/lib/
# tar xf mysql.tar.gz
mysql> change master to \
-> master_host='10.24.24.111',
-> master_user='repl_user',
-> master_password='repl_password',
-> master_log_file='mysql-bin.000002',
-> master_log_pos=271;
需要注意master_log_file和 master_log_pos选项,这两个值是刚才在DB1上查询到的结果
DB2上启动从服务器,并查看DB2上的从服务器运行状态
mysql> start slave;
Query OK, 0 rows affected (0.00 sec)
mysql> show slave status\G;
*************************** 1. row ***************************
Slave_IO_State: Waiting for master to send event
Master_Host: 10.24.24.111
Master_User: repl_user
Master_Port: 3306
Connect_Retry: 60
Master_Log_File: mysql-bin.000002
Read_Master_Log_Pos: 271
Relay_Log_File: mysql-relay-bin.000002
Relay_Log_Pos: 251
Relay_Master_Log_File: mysql-bin.000002
Slave_IO_Running: Yes
Slave_SQL_Running: Yes
Replicate_Do_DB:
Replicate_Ignore_DB:
Replicate_Do_Table:
Replicate_Ignore_Table:
Replicate_Wild_Do_Table:
Replicate_Wild_Ignore_Table: mysql.%,test.%,information_schema.%
Last_Errno: 0
Last_Error:
Skip_Counter: 0
Exec_Master_Log_Pos: 271
Relay_Log_Space: 406
Until_Condition: None
Until_Log_File:
Until_Log_Pos: 0
Master_SSL_Allowed: No
Master_SSL_CA_File:
Master_SSL_CA_Path:
Master_SSL_Cert:
Master_SSL_Cipher:
Master_SSL_Key:
Seconds_Behind_Master: 0
Master_SSL_Verify_Server_Cert: No
Last_IO_Errno: 0
Last_IO_Error:
Last_SQL_Errno: 0
Last_SQL_Error:
1 row in set (0.00 sec)
至此,DB1到DB2的MYSQL主从复制已完成。
DB1上插入数据
mysql> use ywadmin;
mysql> show tables;
+-------------------+
| Tables_in_ywadmin |
+-------------------+
| personal |
+-------------------+
1 row in set (0.00 sec)
mysql> insert into personal values ('001','netseek','1983-03-15','95');
mysql> insert into personal values ('002','heihei','1982-02-24','90');
mysql> insert into personal values ('003','gogo','1985-05-21','85');
mysql> insert into personal values ('004','haha','1984-02-25','84');
mysql> insert into personal values ('005','linlin','1982-04-28','85');
mysql> insert into personal values ('006','xinxin','1985-03-15','75');
mysql> desc personal;
DB2数据库上验证数据是否同步
mysql> use ywadmin;
mysql> select * from personal;
+-----------+-------+------------+------------+
| member_no | name | birthday | exam_score |
+-----------+-------+------------+------------+
| 001 | netse | 1983-03-15 | 95 |
| 002 | heihe | 1982-02-24 | 90 |
| 003 | gogo | 1985-05-21 | 85 |
| 004 | haha | 1984-02-25 | 84 |
| 005 | linli | 1982-04-28 | 85 |
| 006 | xinxi | 1985-03-15 | 75 |
+-----------+-------+------------+------------+
6 rows in set (0.00 sec)
数据已完成复制.
---------------------------------------------
验证数据的完整性
DB2上创建新数据库、表
mysql> create database ywadmin001;
mysql> use ywadmin001;
创建表
mysql> create table personal001(member_no char(9) not null,name001 char(5),birthday001 date,exam_score001 tinyint,primary key(member_no));
查看表内容
mysql> desc personal001;
+---------------+------------+------+-----+---------+-------+
| Field | Type | Null | Key | Default | Extra |
+---------------+------------+------+-----+---------+-------+
| member_no | char(9) | NO | PRI | NULL | |
| name001 | char(5) | YES | | NULL | |
| birthday001 | date | YES | | NULL | |
| exam_score001 | tinyint(4) | YES | | NULL | |
+---------------+------------+------+-----+---------+-------+
4 rows in set (0.00 sec)
vmysql> use ywadmin001;
mysql> insert into personal001 values ('001','netseek','1983-03-15','95');
mysql> insert into personal001 values ('002','heihei','1982-02-24','90');
mysql> insert into personal001 values ('003','gogo','1985-05-21','85');
mysql> select * from personal001;
+-----------+---------+-------------+---------------+
| member_no | name001 | birthday001 | exam_score001 |
+-----------+---------+-------------+---------------+
| 001 | netse | 1983-03-15 | 95 |
| 002 | heihe | 1982-02-24 | 90 |
| 003 | gogo | 1985-05-21 | 85 |
+-----------+---------+-------------+---------------+
3 rows in set (0.00 sec)
并在 personal表中 插入数据
mysql> use ywadmin;
mysql> show tables;
mysql> insert into personal values ('007','ywadmin','1987-11-07','100');
mysql> insert into personal values ('008','ywliyq','1986-12-25','99');
mysql> insert into personal values ('009','xiaxia','1990-12-27','97');
DB1数据库上验证数据是否同步
新的数据库及表是否被创建
mysql> show databases;
+--------------------+
| Database |
+--------------------+
| information_schema |
| mysql |
| ywadmin |
| ywadmin001 |
+--------------------+
4 rows in set (0.00 sec)
mysql> use ywadmin001;
mysql> show tables;
+----------------------+
| Tables_in_ywadmin001 |
+----------------------+
| personal001 |
+----------------------+
1 row in set (0.00 sec)
mysql> select * from personal001;
+-----------+---------+-------------+---------------+
| member_no | name001 | birthday001 | exam_score001 |
+-----------+---------+-------------+---------------+
| 001 | netse | 1983-03-15 | 95 |
| 002 | heihe | 1982-02-24 | 90 |
| 003 | gogo | 1985-05-21 | 85 |
+-----------+---------+-------------+---------------+
3 rows in set (0.00 sec)
新建库、表中的内容已同步。
原表插入的数据是否同步
mysql> use ywadmin;
mysql> select * from personal;
+-----------+-------+------------+------------+
| member_no | name | birthday | exam_score |
+-----------+-------+------------+------------+
| 001 | netse | 1983-03-15 | 95 |
| 002 | heihe | 1982-02-24 | 90 |
| 003 | gogo | 1985-05-21 | 85 |
| 004 | haha | 1984-02-25 | 84 |
| 005 | linli | 1982-04-28 | 85 |
| 006 | xinxi | 1985-03-15 | 75 |
| 007 | ywadm | 1987-11-07 | 100 |
| 008 | ywliy | 1986-12-25 | 99 |
| 009 | xiaxi | 1990-12-27 | 97 |
+-----------+-------+------------+------------+
9 rows in set (0.00 sec)
原表插入的列也已同步, 数据已完成复制.
删除DB2上的库
mysql> drop database ywadmin001;
DB1上检查 ywadmin001库 是否被删除
mysql> show databases;
+--------------------+
| Database |
+--------------------+
| information_schema |
| mysql |
| ywadmin |
+--------------------+
3 rows in set (0.00 sec)
删除很快,基本上是实时同步的.
参考博文:https://blog.51cto.com/ywliyq/1856963


并发问题-锁")
并发死锁问题排查工具")


")
