前言虽然目前主流使用的是UDEV去搭建ASM磁盘,但ASMLib包依旧是Oracle官方推荐的搭建方式,此文档适用于Linux 6和Linux 7,也适用于ASM单实例和RAC环境(唯一的区别是ASMLib包需要分别下载对应OS支持的版本)。本文档以Linux 6的ASM单实例数据库举例。注:udev绑定的方式参考:
http://blog.itpub.net/69992972/viewspace-2754349/
实验环境准备OS:RHEL 6.4
ASM&DB:Oracle 11.2.0.4RPM:oracleasm-support-2.1.8-1.el6.x86_64.rpm,kmod-oracleasm-2.0.6.rh1-2.el6.x86_64.rpm,oracleasmlib-2.0.4-1.el6.x86_64.rpm(缺一不可)RPM下载地址:OL6:
http://yum.oracle.com/repo/OracleLinux/OL6/latest/x86_64/ OL7:
http://yum.oracle.com/repo/OracleLinux/OL7/latest/x86_64/
安装步骤
1. 给磁盘分区
# fdisk /dev/sdb
Welcome to fdisk (util-linux 2.23.2).
Changes will remain in memory only, until you decide to write them.
Be careful before using the write command.
Device does not contain a recognized partition table
Building a new DOS disklabel with disk identifier 0x37d16a21.
Command (m for help): n
Partition type:
p primary (0 primary, 0 extended, 4 free)
e extended
Select (default p):
p
##只需要一个主分区就行,不需要扩展分区,逻辑分区这些
Partition number (1-4, default 1): 1
First sector (2048-106587366, default 2048):
Using default value 2048
Last sector, +sectors or +size{K,M,G} (2048-106587366, default 106587366):
+2G ##随便给个大小,全部划分给主分区都行
Partition 1 of type Linux and of size 2 GiB is set
Command (m for help): w
The partition table has been altered!
Calling ioctl() to re-read partition table.
Syncing disks.
2.
安装Oracle缺失rpm包:# rpm -ivh libaio-devel-0.3.106-3.2.x86_64.rpm# rpm -ivh pdksh-5.2.14-30.x86_64.rpm# rpm -ivh elfutils-libelf-devel-0.152-1.el6.x86_64.rpm
3. 安装ASMLIB包:# rpm -ivh oracleasm-support-2.1.8-1.el6.x86_64.rpm# rpm -ivh kmod-oracleasm-2.0.6.rh1-2.el6.x86_64.rpm# rpm -ivh oracleasmlib-2.0.4-1.el6.x86_64.rpm# oracleasm -V ##安装后查看oracleasm命令是否可用
4. 创建相关用户,组,环境变量和安装目录:
DB:
# groupadd -g 501 oinstall
# groupadd -g 502 dba
# groupadd -g 503 oper
# groupadd -g 504 asmadmin
# groupadd -g 505 asmoper
# groupadd -g 506 asmdba
Grid:
# useradd -g oinstall -G dba,asmdba,oper -u 501 oracle
# passwd oracle
# useradd -g oinstall -G asmadmin,asmdba,asmoper,dba -u 502 grid
# passwd grid
# Oracle Settings oracle用户环境变量
export TMP=/tmp
export TMPDIR=$TMP
export ORACLE_BASE=/oracle/app/oracle
export ORACLE_HOME=$ORACLE_BASE/product/11.2.0/db_1
export ORACLE_SID=
export ORACLE_TERM=xterm
export PATH=/usr/sbin:$PATH
export PATH=$ORACLE_HOME/bin:$PATH
export LD_LIBRARY_PATH=$ORACLE_HOME/lib:/lib:/usr/lib
export CLASSPATH=$ORACLE_HOME/JRE:$ORACLE_HOME/jlib:$ORACLE_HOME/rdbms/jlib
export NLS_LANG=american_america.zhs16cgb231280
$source .bash_profile生效
# grid Settings grid用户环境变量
export TMP=/tmp
export TMPDIR=$TMP
export ORACLE_SID=+ASM
export ORACLE_BASE=/oracle/app/grid
export ORACLE_HOME=$ORACLE_BASE/product/11.2.0/db_1
export ORACLE_TERM=xterm
export PATH=/usr/sbin:$PATH
export PATH=$ORACLE_HOME/bin:$PATH
export LD_LIBRARY_PATH=$ORACLE_HOME/lib:/lib:/usr/lib
export CLASSPATH=$ORACLE_HOME/JRE:$ORACLE_HOME/jlib:$ORACLE_HOME/rdbms/jlib
export NLS_LANG=american_america.zhs16cgb231280
$source .bash_profile生效
# mkdir -p /oracle/app/oracle/product/11.2.0/db_1 ##oracle用户$ORACLE_HOME
# mkdir -p /oracle/app/grid/product/11.2.0/db_1 ##grid用户$GI_HOME
# chown -R oracle:oinstall /oracle/
# chown -R grid:oinstall /oracle/app/grid
# chmod -R 775 /oracle
5. 创建ASM磁盘
# /etc/init.d/oracleasm configure ##初始化
Configuring the Oracle ASM library driver.
This will configure the on-boot properties of the Oracle ASM library
driver. The following questions will determine whether the driver is
loaded on boot and what permissions it will have. The current values
will be shown in brackets ('[]'). Hitting <ENTER> without typing an
answer will keep that current value. Ctrl-C will abort.
Default user to own the driver interface []: grid
Default group to own the driver interface []: oinstall
Start Oracle ASM library driver on boot (y/n) [y]:
Scan for Oracle ASM disks on boot (y/n) [y]:
Writing Oracle ASM library driver configuration: done
Initializing the Oracle ASMLib driver: [ OK ]
Scanning the system for Oracle ASMLib disks: [ OK ]
# fdisk -l# oracleasm createdisk ORACLEASM1 /dev/sdb1 ##创建ASM# oracleasm listdisks ##查看是否创建成功# ls -l /dev/oracleasm/disks ##查看创建的asm磁盘
6. 后续操作
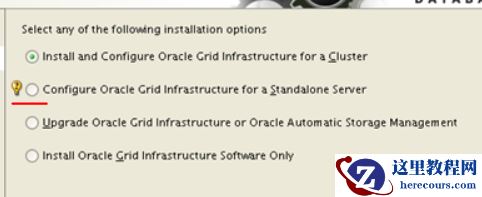
接下来就可以安装grid软件,db软件和建库了
注意:
单实例在安装Grid软件的时候,需要选择下图的第二项,因为需要选择ASM磁盘(RAC可以直接选第一项):
【BUILD_ORACLE】使用ASMLib包搭建ASM磁盘
来源:这里教程网
时间:2026-03-03 16:23:09
作者:
编辑推荐:
- Go中由WaitGroup引发对内存对齐思考03-03
- 【BUILD_ORACLE】使用ASMLib包搭建ASM磁盘03-03
- 还不知道简历如何写?就该这样写!03-03
- 你说那 class 文件里边都是啥03-03
- 降低代码的圈复杂度——复杂代码的解决之道03-03
- 降低代码的圈复杂度——复杂代码的解决之道03-03
- 你说那 class 文件里边都是啥03-03
- PLSQL Developer配置使用03-03
相关推荐
-

-
-
-
-
-
-
-
-
-
-
-
-
-
-

雷神推出 MIX PRO II 迷你主机:基于 Ultra 200H,玻璃上盖 + ARGB 灯效
2 月 9 日消息,雷神 (THUNDEROBOT) 现已宣布推出基于英
-

制造商 Musnap 推出彩色墨水屏电纸书 Ocean C:支持手写笔、第三方安卓应用
2 月 10 日消息,制造商 Musnap 现已在海外推出一款 Oce
热文推荐
- 【BUILD_ORACLE】使用ASMLib包搭建ASM磁盘

【BUILD_ORACLE】使用ASMLib包搭建ASM磁盘
26-03-03 - 干货 | 设计师必备中国风配色卡,快来收藏
干货 | 设计师必备中国风配色卡,快来收藏
26-03-03 - Thread 1 cannot allocate new log

Thread 1 cannot allocate new log
26-03-03 - Oracle database 19c中获取当前数据库版本的方法

Oracle database 19c中获取当前数据库版本的方法
26-03-03 - Oracle如何删除表中重复记录保留第一条

Oracle如何删除表中重复记录保留第一条
26-03-03 - Oracle网络服务基础(二)之监听器与TNS配置管理
之监听器与TNS配置管理")
Oracle网络服务基础(二)之监听器与TNS配置管理
26-03-03 - ORACLE 数据库业务用户密码重置慎用特殊字符

ORACLE 数据库业务用户密码重置慎用特殊字符
26-03-03 - oracle优化之生产系统不改代码解决SQL性能问题的几种方法

oracle优化之生产系统不改代码解决SQL性能问题的几种方法
26-03-03 - Oracle网络服务基础(一)之监听器概念
之监听器概念")
Oracle网络服务基础(一)之监听器概念
26-03-03 - Oracle 21c新特性预览与日常管理相关的几个新特性

Oracle 21c新特性预览与日常管理相关的几个新特性
26-03-03