Oracle Net Configuration Assistant failed异常的解决方案
【环境参数】
Host OS: : Win7 32bit
Client OS: : Oracle Enterprise Linux 5
虚拟机: VMware 10.0..1
Oracle 版本: Oracle 11g R2
【障害场景一再现】
1 、障碍描述:
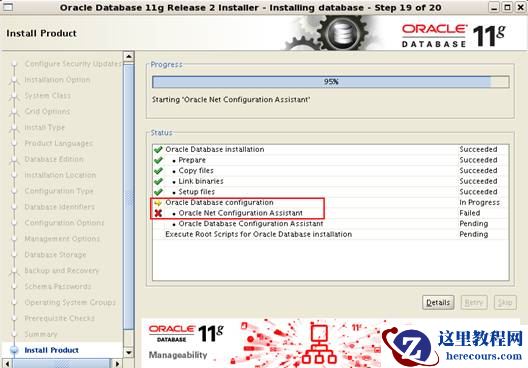
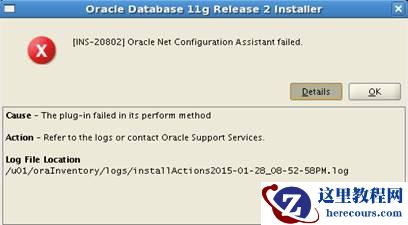
在 CentOS 或者 Oracle Enterprise Linux 环境下, 安装 Oracle11gR2 的过程 中,用户在安装 Oracle 时, 选择了“ Create and Configure a database ”,在安装的过程中出现了“ [INS-20802] Oracle Net Configuration Assistant failed ”的错误, 具体如下图所示。
2 、障碍场景图片
图 1 :
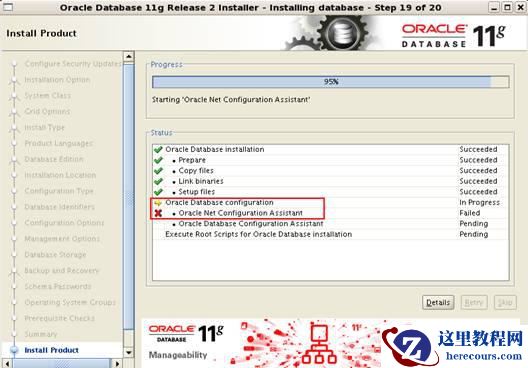
图 2 :
【障碍场景二再现】
1 、障碍描述:
用户在安装 Oracle 时,选择的是“ Install database software only ”之后,启动 DBCA 时出现错误。
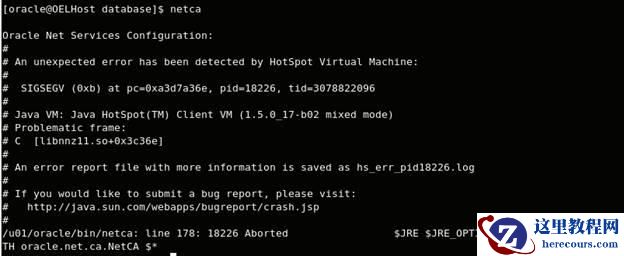
在用户仅仅安装完 Oracle11gRoot 数据库软件 后(即,用户在安装 Oracle 时,选择了“ Install database software only ”),准备通过 netca 来配置 listener 时,在执行 netca 的时候报出“ [INS-20802] Oracle Net Configuration Assistant failed ”错误。
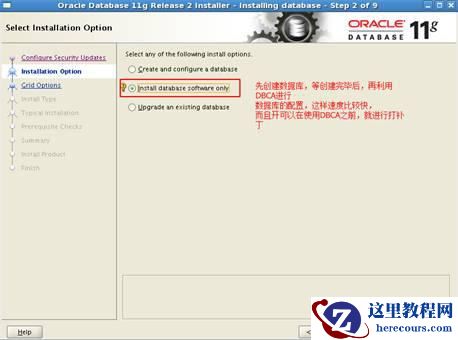
2 、障碍场景图片
【问题原因】
DBCA 程序由于缺少补丁包无法正常启动,需要打 p8670579_112010_LINUX.zip 补丁包。
【解决方案】
到下述网站上下载 p8670579_112010_LINUX.zip 补丁包 , 按照 README.txt 步骤将该补丁打上后执行 dbca,, 创建 db 的图形出来了 , 问题解决 .
p8670579_112010_LINUX.zip 下载:
免费下载地址在 ( Linux 公社的服务器)
用户名与密码都是
具体下载目录在 /2012 年资料 /8 月 /28 日 /Oracle 11gR2 执行 DBCA 报错误
网上搜索了很多相关的帖子 , 基本上说的是 64 位的机器安装了 32 位的数据导致的 , 但我的机器是 32 位的 , 下载的 oracle 版本也是 32 位的 , 但也报这个错误 . 先不管了 , 按照网上说的需要 打补丁 p8670579_112010_LINUX.zip .
【补丁安装步骤】
1. 下载 p8670579_112010_LINUX.zip, 并上传到服务器上的目录 /ftp
2. 确认是否配置了 ORACLE_HOME
[oracle@primary]$ echo $ORACLE_HOME
/u01/app/oracle/product/11.2.0/db_1
3. 检查 perl 的版本 , 需要 5.00503 以上的版本
[oracle@primary 8670579]$ perl -v
This is perl, v5.8.8 built for i386-linux-thread-multi
4. Verify the OUI Inventory.
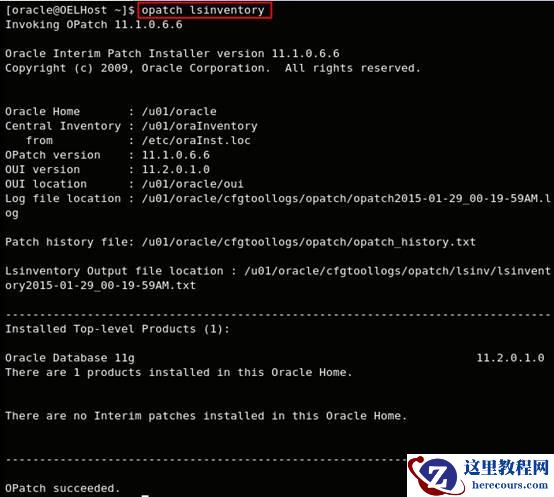
$opatch lsinventory // 若没有将 opath 的路径加入到 oralce 用户的 PATH 变量中,也可以使用以下命令: $/u01/app/oracle/product/11.2.0/db_1/OPatch/opatch lsinventory
注意:
opatch 命令是在 $ORACLE_HOME/OPatch/ 目录下 , 环境变量 PATH 中没有包含该目录的话 , 直接敲入 opatch 命令是提示找不到改命令的 , 这时需要将该目录加入到 PATH 中 .
命令结果如下所示:
5. 解压缩补丁包
$unzip p8670579_112010_LINUX.zip
6. 确保数据库已经停止。
$cd /ftp/8670579
$opatch apply // 在 8670579 这个目录下执行此命令
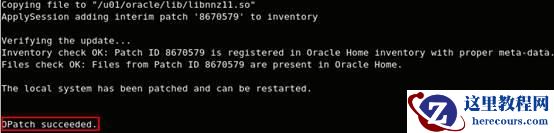
7. 若打完补丁成功,则会出现下属结果。
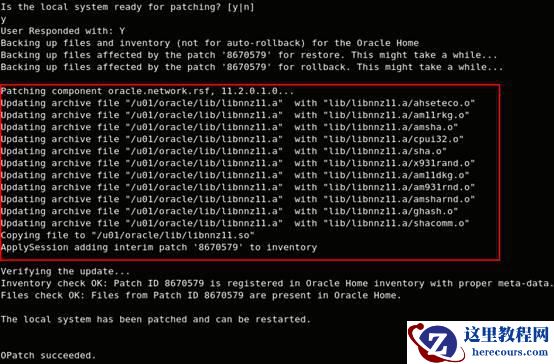
【补丁补充的是什么地方】
【 README.txt 里的说明如下】
README.txt 里的说明如下 :
[oracle@primary 8670579]$ more README.txt ========================================================================= Interim Patch for Base Bug: 8670579 ========================================================================= Date: 25th February 2010 ------------------------------------------------------------------------- Platform. Patch for : Linux x86 Product Patched : NETWORK Product Version # : 11.2.0.1 RAC Rolling Installable : YES Online Installable : NO Bugs Fixed by this patch: ------------------------- 8670579 - DBBETA :NETCA/DBCA FAILED WITH HOTSPOT VIRTUAL MACHINE Patch Preinstall Steps ---------------------- 1. For non-recommended patches, you must have the exact symptoms described in the service request (SR). 2. Confirm the version of Perl installed and configured for the ORACLE_HOME. Oracle requires that all customers have at least Perl 5.00503 installed and configured for patching activities inside the ORACLE_HOME. Follow these steps to check the Perl version for the ORACLE_HOME being patched: - source the ORACLE_HOME environment - execute "perl -v" - verify that the returned version of Perl is 5.00503 or higher If the Perl configured for the ORACLE_HOME is not at 5.00503 or higher, follow the directions in this metalink note to update to a more recent version: https://metalink.oracle.com/metalink/plsql/ml2_documents.showNOT?p_id=189489.1 3. Verify the OUI Inventory. OPatch needs access to a valid OUI inventory to apply patches. Validate the OUI inventory with the following command: % opatch lsinventory If the command errors out, contact Oracle Support and work to validate and verify the inventory setup before proceeding. 4. Review and download the latest version of OPatch. Oracle recommends that all customers be on the latest version of OPatch. Please review the following metalink note and follow the instructions to update to the latest version if needed: https://metalink.oracle.com/metalink/plsql/ml2_documents.showNOT?p_id=224346.1 5. Confirm executables appear in your system PATH. The patching process will use the unzip and the opatch executables. After sourcing the ORACLE_HOME environment, confirm both of these exist before continuing: - "which opatch" - "which unzip" If either of these executables do not show in the PATH, correct the problem before proceeding. 6. Create a location for storing the unzipped patch. This location will be referred to later in the document as . 7. Unzip the patch zip file into the . unzip -d 8. Shut down services running from the ORACLE_HOME. Before applying this patch, do a clean shut down of all services running from the ORACLE_HOME. (a) In a non-RAC environment: Shut down all services that are running from this ORACLE_HOME. Confirm the return status from each shutdown command to verify the shutdown is successful and there are no errors. (b) In a RAC environment: For each node in the RAC system, shut down the services for the specific machine that are running from the ORACLE_HOME. OPatch will be used on each node in the RAC system one at a time. If this patch is not rolling RAC installable treat it as a non-RAC environment and shut down all services. As an example, in the case of a two node RAC system: 1. Stop instances running on node 1. 2. Run 'opatch apply /8670579' on node 1. 3. When the apply finishes, opatch asks for confirmation before going on to apply the patch to node 2. 4. Start instances on node 1. 5. Stop instances running on node 2. 6. Ask opatch to continue to applying the patch to node 2. 7. Start instances on node 2. 9. Apply pre-requisite updates.
Patch Installation Steps: ------------------------- 1. Set your current directory to the directory where the patch is located. % cd /8670579 2. Apply the patch. Use the following command to apply the patch to the ORACLE_HOME: % opatch apply When OPatch starts, it will validate the patch and make sure there are no conflicts with the software already installed in the ORACLE_HOME. OPatch categorizes two types of conflicts: (a) Conflicts with a patch already applied to the ORACLE_HOME In this case, please stop the patch installation and contact Oracle Support Services. (b) Conflicts with subset patch already applied to the ORACLE_HOME In this case, please continue the install, as the new patch contains all the fixes from the existing patch in the ORACLE_HOME. The subset patch will automatically be rolled back prior to the installation of the new patch.
Patch Post Install Instructions: --------------------------------
sqlplus / as sysdba exec SYS.DBMS_METADATA_UTIL.LOAD_STYLESHEETS;
Patch Deinstallation Instructions: ---------------------------------- 1. Make sure to follow the same pre-install steps when deinstalling a patch. This includes verifying the inventory and shutting down any services running from the ORACLE_HOME / machine before rolling the patch back. 2. Change to the directory where the patch was unzipped. % cd /8670579 3. Run OPatch to deinstall the patch. % opatch rollback -id 8670579
注意:
opatch 命令是在 $ORACLE_HOME/OPatch/ 目录下 , 环境变量 PATH 中没有包含该目录的话 , 直接敲入 opatch 命令是提示找不到改命令的 , 这时需要将该目录加入到 PATH 中 .
-------The End------
Nice Day zjrodger