Spring中@Controller和@Service注释的区别
Spring 注释 是提供有关程序的数据的元数据的一种形式。注释用于提供关于程序的补充信息。它对注释代码的操作没有直接影响。它不会改变已编译程序的操作。
Spring @Controller注释
Spring @Controller注释是 @Component 注释。@Controller注释表示一个特定的类充当 controller . Spring Controller注释通常与基于的注释处理程序方法结合使用 @RequestMapping 注释。它只能应用于类。它用于将一个类标记为web请求处理程序。它主要用于Spring MVC应用程序。这个注释充当被注释类的原型,指出它的角色。dispatcher会扫描这些带注释的类,寻找映射的方法并进行检测 @RequestMapping 注释.
实现:项目
Step 1: 创建一个简单的Spring引导项目
请参考本文在Eclipse IDE中创建和设置Spring引导项目,并创建一个简单的Spring引导项目。
Step 2: 在pomm .xml文件中添加spring-web依赖项。转到项目中的pom.xml文件,并添加以下spring-web依赖项。
<dependency> <groupId>org.springframework.boot</groupId> <artifactId>spring-boot-starter-web</artifactId></dependency>
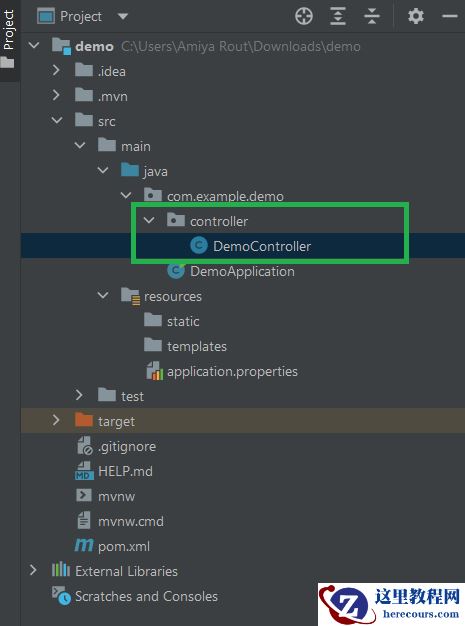
Step 3: 在你的项目中创建一个包并命名为“controller”。在控制器中,包创建了一个类,并将其命名为 DemoController . 这是我们最后的项目结构。
// Java Program to Illustrate DemoController File // Importing package in this code modulepackage com.example.demo.controller;// Importing required classesimport org.springframework.stereotype.Controller;import org.springframework.web.bind.annotation.RequestMapping;import org.springframework.web.bind.annotation.ResponseBody; // Annotation@Controller// Main classpublic class DemoController { @RequestMapping("/hello") @ResponseBody // Method public String helloGFG() { return "Hello GeeksForGeeks"; }}
我们在控制器层中使用了下面的注释。在本例中,URI路径为 /hello.
@Controller : 这用于指定控制器。@RequestMapping : 这用于映射到Spring MVC控制器方法。@ResponseBody : 用于将HTTP响应体与返回类型中的域对象绑定。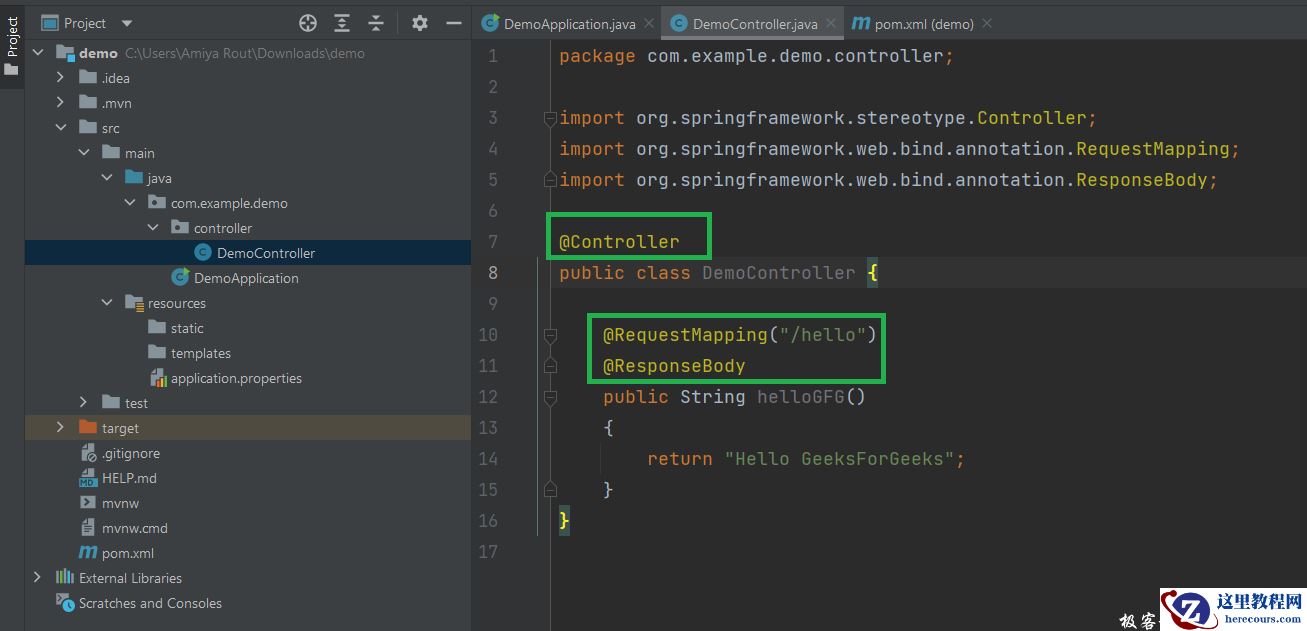
Step 4: 现在,我们的控制器准备好了。让我们在 DemoApplication.java 文件。不需要更改 DemoApplication.java file.
示例
// Java Program to Illustrate DemoApplication File // Importing package in this code modulepackage com.example.demo;// Importing required classesimport org.springframework.boot.SpringApplication;import org.springframework.boot.autoconfigure.SpringBootApplication; // Annotation@SpringBootApplication // Main classpublic class DemoApplication { // Main driver method public static void main(String[] args) { SpringApplication.run(DemoApplication.class, args); }}输出:
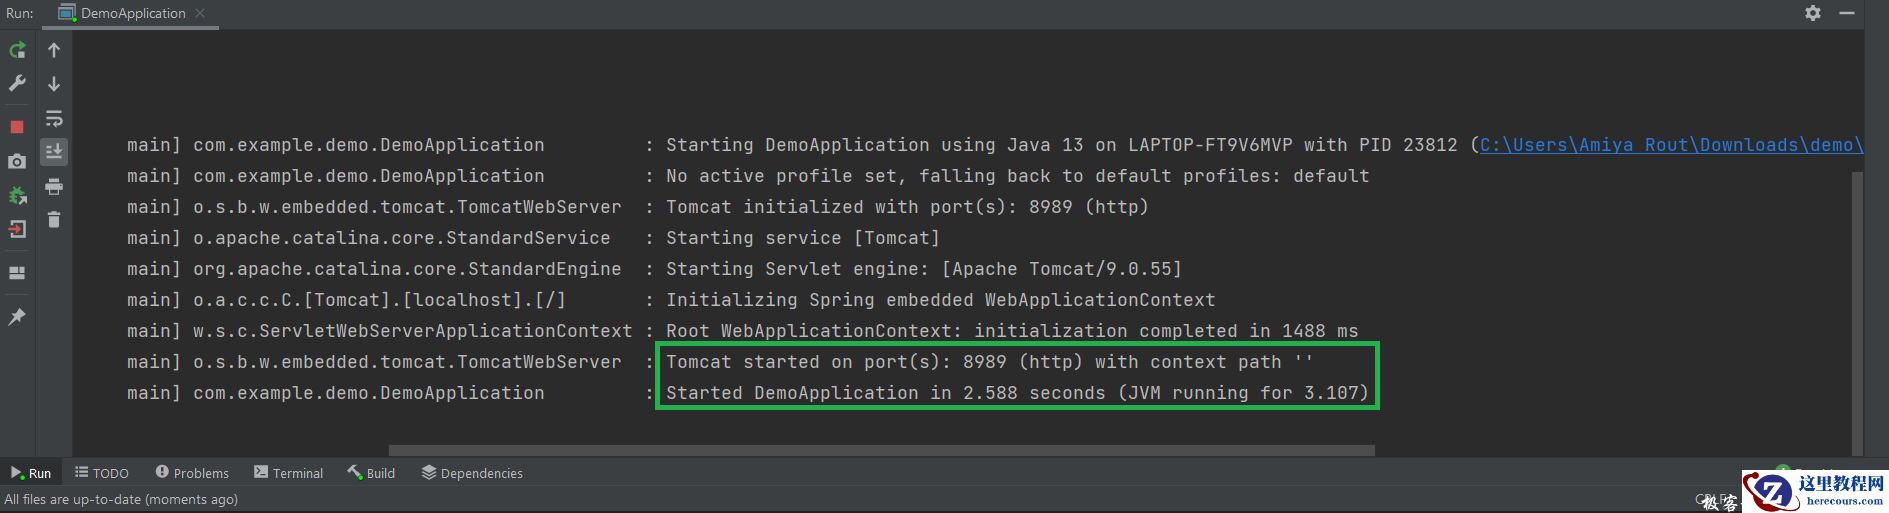
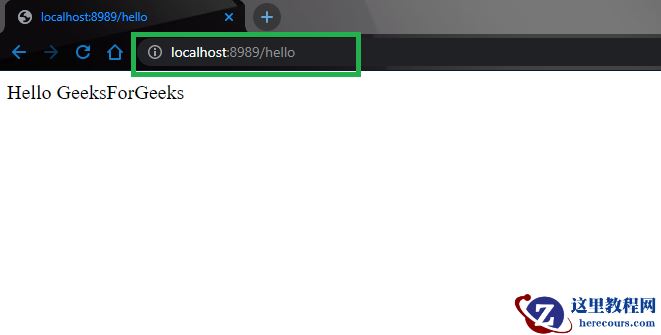
Tip: 尝试下面媒体中描述的Tomcat URL,它正在运行 http://localhost:8989/hello
Spring @Service 注释
在应用程序中,业务逻辑驻留在服务层中,因此我们使用@Service注释来指示类属于该层。它也是像@Repository注释一样的@Component注释的专门化。@Service注释最重要的一点是,它只能应用于类。它用于将类标记为服务提供者。因此,总的来说@Service注释用于提供一些业务功能的类。当使用基于注释的配置和类路径扫描时,Spring上下文将自动检测这些类
示例: Project
Step 1: 创建一个简单的Spring引导项目。
提示:在继续学习如何在Eclipse IDE中创建和设置Spring Boot Project并创建一个简单的Spring Boot Project之前,请务必参考这篇文章。
Step 2: 在pomm .xml文件中添加spring上下文依赖项。转到项目中的pom.xml文件,并添加以下spring上下文依赖项。
文件: pom.xml
<dependency> <groupId>org.springframework</groupId> <artifactId>spring-context</artifactId> <version>5.3.13</version></dependency>
Step 3: 在项目中创建一个包,并将其命名为“service”。在服务中,包创建了一个类,并将其命名为 MyServiceClass” .
File: MyServiceClass
// Java Program to Illustrate MyServiceClass // Importing package module to code modulepackage com.example.demo.service;// Importing required classesimport org.springframework.stereotype.Service; // Annotation@Service // Classpublic class MyServiceClass { // Method // To compute factorial public int factorial(int n) { // Base case if (n == 0) return 1; // Returning factorial of input number return n * factorial(n - 1); }}代码解释:
从上面的代码中,我们可以很容易地看出这是一个简单的java类,它提供了计算数字阶乘的功能。所以我们可以称它为服务提供商。我们已经用@Service注释了它,这样spring-context就可以自动检测它,并且我们可以从上下文获取它的实例。
Step 4: Spring库测试
现在我们的Spring存储库已经准备好了,让我们进行测试。去 DemoApplication.java 文件并参考下面的代码。
File: DemoApplication.java
// Java Program to Illustrate DemoApplication // Importing package module to code fragmentpackage com.example.demo;// Importing required classesimport com.example.demo.service.MyServiceClass;import org.springframework.boot.autoconfigure.SpringBootApplication;import org.springframework.context.annotation.AnnotationConfigApplicationContext; // Annotation@SpringBootApplication // Main classpublic class DemoApplication { // Main driver method public static void main(String[] args) { // Creating context of // AnnotationConfigApplicationContext class AnnotationConfigApplicationContext context = new AnnotationConfigApplicationContext(); context.scan("com.example.demo"); context.refresh(); MyServiceClass myServiceClass = context.getBean(MyServiceClass.class); // Testing the factorial method int factorialOf5 = myServiceClass.factorial(5); System.out.println("Factorial of 5 is: " + factorialOf5); // Closing the spring context // using close() method context.close(); }}输出:

最后,让我们讨论一下@Controller注释和@Service注释之间的区别。
| @ controller注释 | @ service注释 |
|---|---|
| @Controller注释表示一个特定的类充当控制器的角色。 | @Service注释用于提供某些业务功能的类。 |
| @Controller注释是@Component注释的专门化。 | @Service注释也是@Component注释的专门化。 |
| 它只能应用于类。 | 它只能应用于类。 |
| 它用于将一个类标记为web请求处理程序。 | 它用于将类标记为服务提供者。 |
| 它是表示层(spring-MVC)的原型。 | 它是服务层的原型。 |
| 我们不能将这个注释与@Service或@Repository之类的任何其他注释进行切换。 | 切换是可能的。 |


