Oracle 19C Data Guard
基础运维
-0
7
failover
后闪回恢复
dg
架构
 将失败的主数据库闪回物理备用数据库
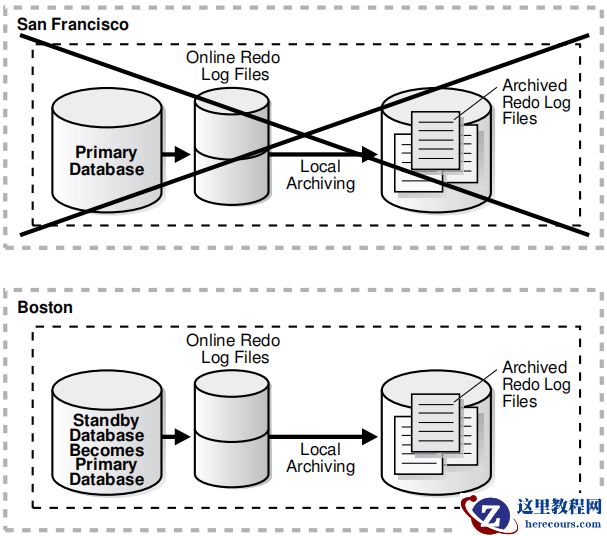
Flashing Back a Failed Primary Database into a Physical
Standby Database
这些步骤将旧的
primary database
作为
physical standby database
带回到Oracle Data Guard
配置中。
These steps bring the old primary database back into the Oracle Data Guard
configuration as a physical standby database.
以下步骤假设已对物理备用数据库执行
failover
,并且在
failover
时已在旧主数据库上启用了闪回数据库。
The following steps assume that a failover has been performed to a physical standby database and that Flashback Database was enabled on the old primary database at the time of the failover.
原主库提前启用闪回数据库
SQL> select FLASHBACK_ON from v$database;
FLASHBACK_ON
------------------
NO
SQL> show parameter recover
y
NAME
TYPE
VALUE
------------------------------------ ----------- ------------------------------
db_recovery_file_dest
string
db_recovery_file_dest_size
big integer 0
SQL>alter system set db_recovery_file_dest_size=10
g
scope=spfile;
[root@cjcos02 ~]# mkdir /flashbak
[root@cjcos02 ~]# chown oracle.oinstall /flashbak
SQL>alter system set db_recovery_file_dest='/flashbak' scope=spfile;
SQL> alter database flashback on;
SQL> shutdown immediate
SQL> Startup
SQL>select FLASHBACK_ON from v$database;
FLASHBACK_ON
------------------
YES
原主库因故障宕机无法open,dg
备库系统执行
failover;
备库执行failover(
可参考如下链接
)
:
http://blog.itpub.net/29785807/viewspace-2686922/
http://blog.itpub.net/29785807/viewspace-2687052/
此时原主库无法直接转换成备库
SQL> alter database commit to switchover to physical standby with session shutdown;
SQL> recover managed standby database using current logfile disconnect from session;
ORA-01665: control file is not a standby control file
需要执行如下步骤,将原主库转换为Physical
Standby Database
:
1.
在新主数据库上,发出以下查询以确定旧备用数据库成为新主数据库的
SCN
On the new primary database, issue the following query to determine the SCN at
which the old standby database became the new primary database:
SQL> SELECT TO_CHAR(STANDBY_BECAME_PRIMARY_SCN) FROM V$DATABASE;
TO_CHAR(STANDBY_BECAME_PRIMARY_SCN)
----------------------------------------
3874221
2.
关闭旧的主数据库
(
如果需要的话
)
,挂载,并将它闪回到上一步中查出的
STANDBY_BECAME_PRIMARY_SCN
值。
Shut down the old primary database (if necessary), mount it, and flash it back to
the value for STANDBY_BECAME_PRIMARY_SCN that was determined in the previous
step.
SQL> SHUTDOWN IMMEDIATE;
SQL> STARTUP MOUNT;
---SQL> FLASHBACK DATABASE TO SCN standby_became_primary_scn;
SQL> FLASHBACK DATABASE TO SCN
3874221;
3.
若要将数据库转换为物理备用数据库,请在旧主数据库上发出以下语句
To convert the database to a physical standby database, issue the following
statement on the old primary database:
SQL> ALTER DATABASE CONVERT TO PHYSICAL STANDBY;
4.
要开始将
redo
传输到新的物理备用数据库,请在新的主数据库上执行以下步骤
To start transporting redo to the new physical standby database, perform the
following steps on the new primary database:
a.
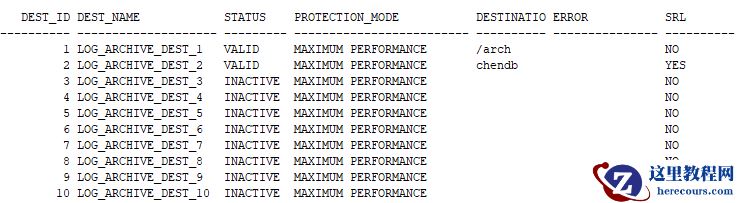
发出以下查询,查看存档目的地的当前状态
:
a. Issue the following query to see the current state of the archive destinations:
SQL> col dest_name for a20
SQL> col destination for a10
SQL> col protection_mode for a25
SQL> col error for a15
SQL> col srl for a10
SQL> set linesize 200
SQL> SELECT DEST_ID, DEST_NAME, STATUS, PROTECTION_MODE, DESTINATION,ERROR,SRL FROM V$ARCHIVE_DEST_STATUS;
将失败的主数据库闪回物理备用数据库
Flashing Back a Failed Primary Database into a Physical
Standby Database
这些步骤将旧的
primary database
作为
physical standby database
带回到Oracle Data Guard
配置中。
These steps bring the old primary database back into the Oracle Data Guard
configuration as a physical standby database.
以下步骤假设已对物理备用数据库执行
failover
,并且在
failover
时已在旧主数据库上启用了闪回数据库。
The following steps assume that a failover has been performed to a physical standby database and that Flashback Database was enabled on the old primary database at the time of the failover.
原主库提前启用闪回数据库
SQL> select FLASHBACK_ON from v$database;
FLASHBACK_ON
------------------
NO
SQL> show parameter recover
y
NAME
TYPE
VALUE
------------------------------------ ----------- ------------------------------
db_recovery_file_dest
string
db_recovery_file_dest_size
big integer 0
SQL>alter system set db_recovery_file_dest_size=10
g
scope=spfile;
[root@cjcos02 ~]# mkdir /flashbak
[root@cjcos02 ~]# chown oracle.oinstall /flashbak
SQL>alter system set db_recovery_file_dest='/flashbak' scope=spfile;
SQL> alter database flashback on;
SQL> shutdown immediate
SQL> Startup
SQL>select FLASHBACK_ON from v$database;
FLASHBACK_ON
------------------
YES
原主库因故障宕机无法open,dg
备库系统执行
failover;
备库执行failover(
可参考如下链接
)
:
http://blog.itpub.net/29785807/viewspace-2686922/
http://blog.itpub.net/29785807/viewspace-2687052/
此时原主库无法直接转换成备库
SQL> alter database commit to switchover to physical standby with session shutdown;
SQL> recover managed standby database using current logfile disconnect from session;
ORA-01665: control file is not a standby control file
需要执行如下步骤,将原主库转换为Physical
Standby Database
:
1.
在新主数据库上,发出以下查询以确定旧备用数据库成为新主数据库的
SCN
On the new primary database, issue the following query to determine the SCN at
which the old standby database became the new primary database:
SQL> SELECT TO_CHAR(STANDBY_BECAME_PRIMARY_SCN) FROM V$DATABASE;
TO_CHAR(STANDBY_BECAME_PRIMARY_SCN)
----------------------------------------
3874221
2.
关闭旧的主数据库
(
如果需要的话
)
,挂载,并将它闪回到上一步中查出的
STANDBY_BECAME_PRIMARY_SCN
值。
Shut down the old primary database (if necessary), mount it, and flash it back to
the value for STANDBY_BECAME_PRIMARY_SCN that was determined in the previous
step.
SQL> SHUTDOWN IMMEDIATE;
SQL> STARTUP MOUNT;
---SQL> FLASHBACK DATABASE TO SCN standby_became_primary_scn;
SQL> FLASHBACK DATABASE TO SCN
3874221;
3.
若要将数据库转换为物理备用数据库,请在旧主数据库上发出以下语句
To convert the database to a physical standby database, issue the following
statement on the old primary database:
SQL> ALTER DATABASE CONVERT TO PHYSICAL STANDBY;
4.
要开始将
redo
传输到新的物理备用数据库,请在新的主数据库上执行以下步骤
To start transporting redo to the new physical standby database, perform the
following steps on the new primary database:
a.
发出以下查询,查看存档目的地的当前状态
:
a. Issue the following query to see the current state of the archive destinations:
SQL> col dest_name for a20
SQL> col destination for a10
SQL> col protection_mode for a25
SQL> col error for a15
SQL> col srl for a10
SQL> set linesize 200
SQL> SELECT DEST_ID, DEST_NAME, STATUS, PROTECTION_MODE, DESTINATION,ERROR,SRL FROM V$ARCHIVE_DEST_STATUS;
 ......
b.
如有必要,启用
destination:
b. If necessary, enable the destination:
SQL> ALTER SYSTEM SET LOG_ARCHIVE_DEST_STATE_n=ENABLE;
执行日志切换,以确保备用数据库开始接收来自新主数据库的重做数据,并验证它已成功发送。在新的主数据库上发出以下SQL
语句
:
c. Perform a log switch to ensure the standby database begins receiving redo
data from the new primary database, and verify it was sent successfully. Issue
the following SQL statements on the new primary database:
SQL> ALTER SYSTEM SWITCH LOGFILE;
SQL> SELECT DEST_ID, DEST_NAME, STATUS, PROTECTION_MODE, DESTINATION,ERROR,SRL FROM V$ARCHIVE_DEST_STATUS;
在新的备用数据库上,您可能还需要更改LOG_ARCHIVE_DEST_n
初始化参数,以便重做传输服务不会将重做数据传输到其他数据库。
On the new standby database, you may also need to change the
LOG_ARCHIVE_DEST_n initialization parameters so that redo transport services
do not transmit redo data to other databases.
5.
启动重做应用到新的物理备用数据库
Start Redo Apply on the new physical standby database:
SQL> ALTER DATABASE RECOVER MANAGED STANDBY DATABASE DISCONNECT;
6.
查看数据同步
新主库31.100 chendb:
SQL> insert into test1 values(4);
1 row created.
SQL> insert into test1 values(5);
1 row created.
SQL> commit;
新备库31.90 cjcdb:
SQL> select * from test1;
ID
----------
1
2
3
4
5
欢迎关注我的微信公众号"IT小Chen",共同学习,共同成长!!!
......
b.
如有必要,启用
destination:
b. If necessary, enable the destination:
SQL> ALTER SYSTEM SET LOG_ARCHIVE_DEST_STATE_n=ENABLE;
执行日志切换,以确保备用数据库开始接收来自新主数据库的重做数据,并验证它已成功发送。在新的主数据库上发出以下SQL
语句
:
c. Perform a log switch to ensure the standby database begins receiving redo
data from the new primary database, and verify it was sent successfully. Issue
the following SQL statements on the new primary database:
SQL> ALTER SYSTEM SWITCH LOGFILE;
SQL> SELECT DEST_ID, DEST_NAME, STATUS, PROTECTION_MODE, DESTINATION,ERROR,SRL FROM V$ARCHIVE_DEST_STATUS;
在新的备用数据库上,您可能还需要更改LOG_ARCHIVE_DEST_n
初始化参数,以便重做传输服务不会将重做数据传输到其他数据库。
On the new standby database, you may also need to change the
LOG_ARCHIVE_DEST_n initialization parameters so that redo transport services
do not transmit redo data to other databases.
5.
启动重做应用到新的物理备用数据库
Start Redo Apply on the new physical standby database:
SQL> ALTER DATABASE RECOVER MANAGED STANDBY DATABASE DISCONNECT;
6.
查看数据同步
新主库31.100 chendb:
SQL> insert into test1 values(4);
1 row created.
SQL> insert into test1 values(5);
1 row created.
SQL> commit;
新备库31.90 cjcdb:
SQL> select * from test1;
ID
----------
1
2
3
4
5
欢迎关注我的微信公众号"IT小Chen",共同学习,共同成长!!!
Oracle 19C Data Guard基础运维-07 failover后闪回恢复dg架构
来源:这里教程网
时间:2026-03-03 15:31:01
作者:
编辑推荐:
下一篇:
相关推荐
-

-
-
-
-
-
-
-
-
-
-
-
-
-
-

雷神推出 MIX PRO II 迷你主机:基于 Ultra 200H,玻璃上盖 + ARGB 灯效
2 月 9 日消息,雷神 (THUNDEROBOT) 现已宣布推出基于英
-

制造商 Musnap 推出彩色墨水屏电纸书 Ocean C:支持手写笔、第三方安卓应用
2 月 10 日消息,制造商 Musnap 现已在海外推出一款 Oce

![[20200420]V$SES_OPTIMIZER_ENV 查不到刚修改的隐含参数.txt](/d/file/efpub/2026/03-03/small87105623285d9500e1fabc2b52e2c4061772523049.jpg "[20200420]V$SES_OPTIMIZER_ENV 查不到刚修改的隐含参数.txt")
热文推荐
- Oracle 19C Data Guard基础运维-07 failover后闪回恢复dg架构
- Oracle 19C Data Guard基础运维-08 DML重定向

Oracle 19C Data Guard基础运维-08 DML重定向
26-03-03 - [20200420]V$SES_OPTIMIZER_ENV 查不到刚修改的隐含参数.txt
- oracle如何查看执行计划

oracle如何查看执行计划
26-03-03 - Oracle 20C 多租户_体系结构介绍

Oracle 20C 多租户_体系结构介绍
26-03-03 - PLSQL Developer 行号

PLSQL Developer 行号
26-03-03 - extractvalue处理XMLTYPE类型超过4000字节ORA-01706的解决方法
- Oracle 数据库的众多 “NAME”

Oracle 数据库的众多 “NAME”
26-03-03 - Oracle 19C+13.4EMCC数据库监控

Oracle 19C+13.4EMCC数据库监控
26-03-03 - Oracle GoldenGate 11g官方文档Administrator’s Guide续一

