AI 向量搜索是现代生成式 AI 生态系统的重要组成部分 , 它 可以大大增强信息 检索,通过基于语义进行高效搜索,而不是确切的关键字。
一、 ONNX 模型 生成
可以通过外网查找下载已经生成好的 onnx模型。
1. 1 安装 操作系统 rpm 包
sudo yum install perl-Env libffi-devel openssl openssl-devel tk-devel xz-devel zlib-devel bzip2-devel readline-devel libuuid-devel ncurses-devel 默认 python是3.12.1,需要3.12.3
1. 2 opc 用户 下安装 python
[root@localhost ~]# useradd opc [root@localhost opc]# ls -l /etc/sudoers -r--r-----. 1 root root 4328 Feb 14 2024 /etc/sudoers [root@localhost opc]# chmod +w /etc/sudoers [root@localhost opc]# vi /etc/sudoers opc ALL=(ALL) ALL [root@localhost opc]# chmod -w /etc/sudoers [root@localhost ~]# su - opc wget https://www.python.org/ftp/python/3.12.11/Python-3.12.11.tar.xz 解压,配置 tar xzf Python-3.12.3.tgz cd Python-3.12.3 ./configure --enable-optimizations 安装 make -j `nproc` ##############-j后面带cpu核数,提升速度,nproc指所有核数,echo `nproc` sudo make altinstall
1.3 pip 安装 python 所需模块
切换到 Oracle用户,创建虚拟环境并激活 su - oracle python3.12 -m venv newenv source newenv/bin/activate pip 安装模块 pip install --upgrade pip setuptools pip install --upgrade "numpy>=1.26.4" pip install --upgrade "pandas>=2.1.1" pip install --upgrade "matplotlib>=3.7.2" pip install --upgrade "oracledb>=2.0.1" pip install --upgrade "scikit_learn>=1.2.1" pip install transformers pip install torch #######网络不稳定,pip install torch --resume-retries=10,或者下载下来pip install torch-2.7.1-cp312-cp312-manylinux_2_28_x86_64.whl pip install onnx pip install onnxruntime pip install onnxruntime_extensions pip install sentencepiece==0.2.0 pip下载慢, 可以修改安装源 清华镜像: https://pypi.tuna.tsinghua.edu.cn/simple 阿里云镜像: https://mirrors.aliyun.com/pypi/simple/ 豆瓣镜像: https://pypi.doubanio.com/simple/ 修改方式 oracle用户目录下创建.pip目录,在新建的目录下创建 pip.conf, 内容如下: cat ~/.pip/pip.conf [global] index-url = https://mirrors.aliyun.com/pypi/simple/ [install] trusted-host = mirrors.aliyun.com 或者安装 -i带地址 pip install onnx -i https://mirrors.aliyun.com/pypi/simple/
1.4 通过 OML4Py 客户端生成 ONNX
下载 OML4Py 2.0 client zip(https://www.oracle.com/database/technologies/oml4py-downloads.html),上传到虚机并在oracle用户下unzip unzip oml4py-client-linux-x86_64-2.0.zip Oracle用户安装OML4PY客户端(注意事先激活newenv虚拟环境) source newenv/bin/activate perl -Iclient client/client.pl (newenv) [oracle@localhost ~]$ perl -Iclient client/client.pl Oracle Machine Learning for Python 2.1 Client. Copyright (c) 2018, 2025 Oracle and/or its affiliates. All rights reserved. Checking platform .................. Pass Checking Python .................... Pass Checking dependencies .............. Pass Checking OML4P version ............. Pass Current configuration Python Version ................... 3.12.3 PYTHONHOME ....................... /home/oracle/newenv Existing OML4P module version .... 2.1 Operation ........................ Install/Upgrade Proceed? [yes]yes Found existing installation: oml 2.1 Uninstalling oml-2.1: Successfully uninstalled oml-2.1 Processing ./client/oml-2.1-cp312-cp312-linux_x86_64.whl Installing collected packages: oml Successfully installed oml-2.1 Done 查看预先配置模型 (newenv) [oracle@localhost datapump]$ python Python 3.12.3 (main, Jun 15 2025, 23:17:42) [GCC 8.5.0 20210514 (Red Hat 8.5.0-21.0.1)] on linux Type "help", "copyright", "credits" or "license" for more information. >>> from oml.utils import EmbeddingModel, EmbeddingModelConfig >>> EmbeddingModelConfig.show_preconfigured() UserWarning:EmbeddingModelConfig.show_preconfigured is deprecated and will be removed in a future release. Please use the method in ONNXPipelineConfig instead. ['sentence-transformers/all-mpnet-base-v2', 'sentence-transformers/all-MiniLM-L6-v2', 'sentence-transformers/multi-qa-MiniLM-L6-cos-v1', 'sentence-transformers/distiluse-base-multilingual-cased-v2', 'sentence-transformers/all-MiniLM-L12-v2', 'BAAI/bge-small-en-v1.5', 'BAAI/bge-base-en-v1.5', 'taylorAI/bge-micro-v2', 'intfloat/e5-small-v2', 'intfloat/e5-base-v2', 'thenlper/gte-base', 'thenlper/gte-small', 'TaylorAI/gte-tiny', 'sentence-transformers/paraphrase-multilingual-mpnet-base-v2', 'intfloat/multilingual-e5-base', 'intfloat/multilingual-e5-small', 'sentence-transformers/stsb-xlm-r-multilingual', 'Snowflake/snowflake-arctic-embed-xs', 'Snowflake/snowflake-arctic-embed-s', 'Snowflake/snowflake-arctic-embed-m', 'mixedbread-ai/mxbai-embed-large-v1', 'openai/clip-vit-large-patch14', 'google/vit-base-patch16-224', 'microsoft/resnet-18', 'microsoft/resnet-50', 'WinKawaks/vit-tiny-patch16-224', 'Falconsai/nsfw_image_detection', 'WinKawaks/vit-small-patch16-224', 'nateraw/vit-age-classifier', 'rizvandwiki/gender-classification', 'AdamCodd/vit-base-nsfw-detector', 'trpakov/vit-face-expression', 'BAAI/bge-reranker-base'] Python生成all_MiniLM_L12_v2.onnx (newenv) -bash-4.4$ python Python 3.12.3 (main, Jun 15 2025, 23:17:42) [GCC 8.5.0 20210514 (Red Hat 8.5.0-21.0.1)] on linux Type "help", "copyright", "credits" or "license" for more information. >>> from oml.utils import EmbeddingModel, EmbeddingModelConfig >>> em = EmbeddingModel(model_name='sentence-transformers/all-MiniLM-L12-v2',settings={'ignore_checksum_error':True}) >>> em.export2file("all-MiniLM-L12-v2",output_dir=".") >>> exit() (newenv) -bash-4.4$ 要求能通 huggingface.co 网络
二、 ONNX 模型 在数据库中使用
2.1 将ONNX 模型加载到数据库中
mkdir /home/oracle/datapump/ 将生成的 all_MiniLM_L12_v2.onnx模型放入到 /home/oracle/datapump/ 创建 directory 目录 SQL> create directory datapump as '/home/oracle/datapump/'; SQL> grant read,write on directory datapump to test; --加载导入模型: BEGIN DBMS_VECTOR.load_onnx_model( directory => 'DATAPUMP' , file_name => 'all_MiniLM_L12_v2.onnx' , model_name => 'ALL_MINILM_L12_V2' , metadata => JSON( '{"function" : "embedding", "embeddingOutput" : "embedding", "input": {"input": ["DATA"]}}' )); END ; / 不需要的模型,可以 删除模型(可选) exec DBMS_VECTOR.drop_onnx_model('ALL_MINILM_L12_V2'); 查询导入的 onnx 模型 查询 dba_mining_models 或 user_mining_models 视图 SQL> select model_name,algorithm,mining_function from dba_mining_models where model_name='ALL_MINILM_L12_V2'; MODEL_NAME ALGORITHM MINING_FUNCTION ------------------------------ ------------------------------ ------------------------------ ALL_MINILM_L12_V2 ONNX EMBEDDING 测试模型是否可用 SQL> SELECT TO_VECTOR(VECTOR_EMBEDDING(ALL_MINILM_L12_V2 USING 'hello' as data)) AS VECTOR_EMBEDDING; VECTOR_EMBEDDING -------------------------------------------------------------------------------- [-7.49070123E-002,-1.44331167E-002,4.8649881E-002,-2.71381158E-002,
2.2 使用例子
创建表
SQL> CREATE TABLE TEST.
DOC
_DETAIL
(
ID NUMBER,
DOC
VARCHAR2(2000 BYTE),
DOC
_VEC VECTOR
)
;
插入数据
SQL> insert into
doc
_detail values(10,'
某段时间上映的电影的市场占有率
','');
insert into
doc
_detail values(9,'
女性观众最爱看的前十部电影
','');
insert into
doc
_detail values(8,'
暑期档的电影播放排名,取前
5
名
','');
insert into
doc
_detail values(7,'
不同年龄段的观众看电影的次数
','');
insert into
doc
_detail values(6,'
看电影次数与收入的关系
','');
insert into
doc
_detail values(5,'
看电影最多的城市排名
','');
insert into
doc
_detail values(4,'
播放电影最多的渠道
','');
insert into
doc
_detail values(3,'
收入排名前
10
的电影
','');
insert into
doc
_detail values(2,'
按年分组,每年的电影总收入
','');
insert into
doc
_detail values(1,'
按演员分组电影总收入排名
','');
commit;
使用
ALL_MINILM_L12_V2
模型转化
doc
内容,更新
doc_vec
字段,生成向量值
SQL> update doc_detail set doc_vec=VECTOR_EMBEDDING(ALL_MINILM_L12_V2 USING doc as data);
commit;
查看更新后的内容
select * from DOC_DETAIL order by ID;
 查询最接近的描述
SELECT
id
, DOC
FROM
DOC_DETAIL
ORDER
BY
VECTOR_DISTANCE(doc_vec,
VECTOR_EMBEDDING(ALL_MINILM_L12_V2
USING
'
电影前
10'
as
data
),
EUCLIDEAN)
FETCH
EXACT
FIRST
1
ROWS
ONLY
;
查询最接近的描述
SELECT
id
, DOC
FROM
DOC_DETAIL
ORDER
BY
VECTOR_DISTANCE(doc_vec,
VECTOR_EMBEDDING(ALL_MINILM_L12_V2
USING
'
电影前
10'
as
data
),
EUCLIDEAN)
FETCH
EXACT
FIRST
1
ROWS
ONLY
;
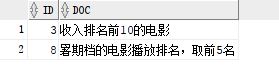
 查询最匹配的
2
个,修改
FIRST
1
为
FIRST
2
查询最匹配的
2
个,修改
FIRST
1
为
FIRST
2
 参考资料
https://github.com/minqiaowang/my-documents/blob/main/db23ai-vector-search/oracle-ai-vector-search/Oracle%20AI%20Vector%20Search%E5%AD%A6%E4%B9%A0.md
https://blogs.oracle.com/machinelearning/post/oml4py-leveraging-onnx-and-hugging-face-for-advanced-ai-vector-search
参考资料
https://github.com/minqiaowang/my-documents/blob/main/db23ai-vector-search/oracle-ai-vector-search/Oracle%20AI%20Vector%20Search%E5%AD%A6%E4%B9%A0.md
https://blogs.oracle.com/machinelearning/post/oml4py-leveraging-onnx-and-hugging-face-for-advanced-ai-vector-search


")

")


